Plane 2d Drawings Top View
Based on feedback from my previous article in the Baronial 2011 outcome of MA, the near requested information was where to start. This is oftentimes the hardest office of any new projection or learning feel. Because of the somewhat complex nature of estimator-aided blueprint (CAD)0, initially this can be a tough question to answer. Subsequently some of the basics are explained, information technology becomes much less complex. There are basically two types of CAD: 2-D drawing and 3-D modeling. The majority of the feedback I received was regarding 2-D cartoon and how to create a prepare of plans from which to build, so I will focus on that. I want to have you through drawing a few unproblematic objects to use in future drawings, and and so finally accept a three-view, and make a prepare of plans from which you can build a model. The bodily pace-past-step sit-in is available on the MA website in video format. I will introduce methods and tools that work for me, and build upon what I presented in the previous article. The ideas, methods and software presented here and in the videos piece of work for me, but they are past no means the only mode of accomplishing the task at mitt. As you become more familiar with CAD, you may observe unlike methods that work ameliorate for you. I am using DevCAD for the demonstrations, only the principles are the same for most 2-D CAD programs. I am not promoting this production, or claiming it is the best. I chose DevCAD for the following reasons: Some of the basic cartoon tools nosotros'll be starting out with are the line, rectangle, and circle. Along with those are some tools to aid us in cartoon such as the zoom and snap tools. There are ii snap toolbars. In DevCAD the one at the lesser defines the blazon of snap; most of the fourth dimension you lot set this once and forget about information technology. Some of import ones are: The Object Snap toolbar works when the OSnap feature is enabled. Information technology is best to only take one or ii of these agile at a time, or the cursor will effort to snap to too many places, making information technology more hard to get exact placement of where you want to beginning or stop a drawing object. Some useful snaps to use include End Point, Mid Betoken, and Circle Center. When working on your drawing, remember these tips: 3) Pressing esc on the keyboard will cancel whatever y'all are doing at the time. four) Relieve and relieve frequently. This is truthful with any computer program you apply. Earlier we showtime drawing our plane, let'due south start with something easier to go familiar with the functionality of a CAD plan. For our airplane nosotros will need servos, hardware, and a motor/engine and then why non offset with those? In consequence we'll besides be building a parts library in the process. Y'all tin can then use these parts in future drawings. Before you brainstorm, gather the servo you desire to depict and a ruler with one/32-inch markings. Alternatively, I have an inexpensive caliper that I utilise for this. The scale is in decimal points, so I don't demand to catechumen from fractions to decimals. Yous can get more precise measurements than that if you wish, only I notice 1/32-inch or three decimal places is close enough for my drawings. I similar to draw three-views for each component I am going to use in future drawings: top, lesser, and side. Even if your area of interest is FF, or CL, these are good exercises to larn the basics of CAD. I too find it useful to draw a quick sketch on paper with the dimensions for the parts I will be cartoon. This will make drawing the part in CAD much quicker. Please refer to the video below for detailed, step-by-stride demonstrations. The videos cover: 5) Drawing servo artillery to use with the previously drawn servos.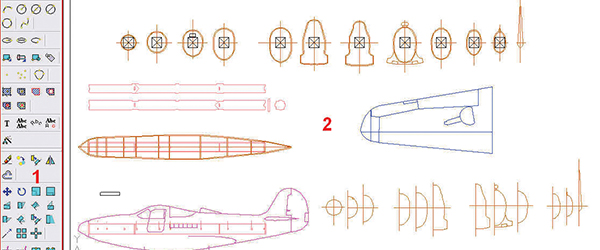
Written by David Walker As featured on page 33 in the Oct 2012 event of Model Aviation. As featured in the Model Aviation tablet app.
When you lot open the CAD programme the outset time it may seem rather daunting. If you lot intermission information technology down into manageable sections, information technology becomes much easier.
The zoom tools are just what you retrieve they are. They will permit you to zoom in and out within your drawing. Some of the important zoom tools include:
Another important toolbar is the snap toolbar. Snaps are a very useful feature in any CAD program. They let you to offset or finish a drawn object at verbal locations. If you decide to take your parts machine cut by a light amplification by stimulated emission of radiation or CNC router, it is necessary that there are no cleaved lines. Fifty-fifty if you are just printing your drawing to build from it, snaps will make your drawing easier to utilize, and information technology volition wait more professional.
ane) Select a drawing tool.
two) Pressing enter on the keyboard will complete a drawing object or control.1) Creating a new drawing.
2) Customizing your drawing environment.
3) Drawing a top view of a servo.
4) Cartoon the side, and finish view of the servo using the top view as a reference.
six) Creating a block library and then nosotros can easily use the servo and servo arm drawings in future drawings.
Source: https://www.modelaviation.com/2DCAD
0 Response to "Plane 2d Drawings Top View"
Postar um comentário